In this post
- At a Glance
- Why Punch Needle Floral Embroidery Works for Beginners
- Materials and Tools Needed
- Choosing the Right Foundation Fabric
- Cutting and Preparation
- Step 1: Design Transfer and Hoop Setup
- Step 2: Threading and Punching the Design
- Step 3: Tension Check and Securing Ends
- Troubleshooting Common Punch Needle Issues
- Care and Display Tips
- Frequently Asked Questions
- Enjoying Your Finished Punch Needle Home Decor
Creating textured textile art is simple and satisfying when you explore punch needle floral embroidery for beginners. This hands-on project teaches you how to transform basic wool yarn and monk’s cloth into a plush, dimensional wall hanging in just 2-3 hours. If you have felt intimidated by intricate hoop crafts in the past, punch needle eliminates complex counting and knotting. Instead, you work with a hollow needle that glides through loosely woven foundation fabric, instantly creating soft, tactile loops on the reverse side. In this step-by-step guide, you will learn how to mount foundation cloth drum-tight, thread an ergonomic wooden punch needle, work concentric color-blocked floral motifs, and finish your 10 in (25 cm) diameter hoop for instant home decor display. The repetitive rhythm of punching makes this an approachable embroidery technique that yields bold results right from your first attempt.
At a Glance
Before you gather your supplies, review the core specifications for this floral embroidery hoop project:
| Project Detail | Specification |
|---|---|
| Craft | Punch Needle Embroidery |
| Skill Level | Beginner |
| Time to Complete | 2-3 hours |
| Finished Size | 10 in (25 cm) diameter |
| Foundation Fabric | 1/4 yard (0.25 m) monk’s cloth |
| Key Technique | Uniform looped pile stitching & concentric color blocking |
Why Punch Needle Floral Embroidery Works for Beginners
Punch needle embroidery differs fundamentally from traditional surface stitching because it relies on friction rather than knots. As you push the hollow metal needle down through the monk’s cloth, it deposits a loop of yarn on the working underside. When you draw the needle back up, the tightly woven threads of the foundation fabric snap around the yarn strand, holding the loop securely in place. This mechanism means you do not have to tie off individual stitches or worry about uneven thread tension across different stitches.
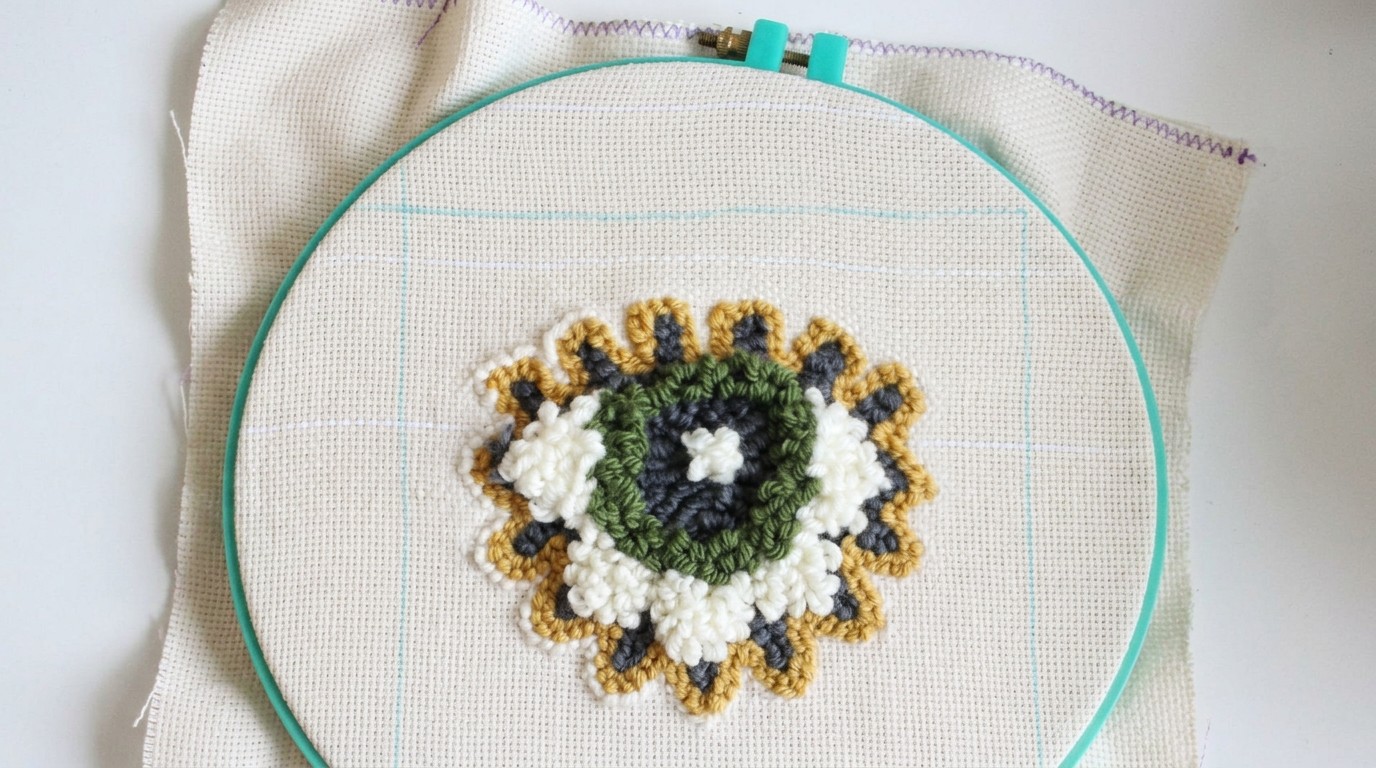
The floral concentric design is especially forgiving for new stitchers. Because the pattern builds outward in distinct color bands—moving from an inner white core to dark grey, olive green, and mustard yellow petals—you can master one color section at a time. The dense, thick pile of the loops naturally fills in small irregularities along the outlines, giving your finished motif a clean, cohesive appearance even if your stitch spacing varies slightly as you learn.
Pro tip: Keep your needle tip touching the surface of the monk’s cloth as you glide to the next stitch. Lifting the needle too high pulls your previous loop right out of the fabric.
Materials and Tools Needed
Having the correct combination of foundation fabric, needle size, and yarn ensures your loops remain secure without distorting the weave.
- 1/4 yard (0.25 m) monk’s cloth: A loosely woven foundation fabric (approximately 12 to 14 holes per inch) that holds punch needle yarn.
- Assorted punch needle yarn: Medium worsted-weight embroidery or tapestry wool yarn in four colors: off-white, dark grey, olive green, and mustard yellow.
- 10 in (25 cm) embroidery hoop: A sturdy plastic hoop with a secure tightening screw to maintain the required fabric tension.
- Punch needle tool with wooden handle: An ergonomic medium-to-chunky gauge punch needle tool designed for wool yarn.
- Yarn threader: A long, flexible wire threader matched to your punch needle tool barrel.
- Fabric scissors: Sharp shears for cutting foundation cloth and trimming yarn tails cleanly.
Choosing the Right Foundation Fabric
The success of punch needle embroidery depends heavily on the structure of your backing cloth. Monk’s cloth is the standard foundation for medium and heavy yarn punch needles because it features a distinctive basketweave structure, woven with double threads in both directions. This loose grid allows the thick punch needle point to slide between the yarn strands without severing or tearing them. When the needle retracts, the cotton threads shift back into alignment, clamping around your loop.
A medium-weight linen-cotton blend can also work for smaller gauge needles, provided the weave is open enough to let the needle penetrate smoothly. Avoid tightly woven quilting cottons, heavy canvas, and stretchy knits. Tightly woven fabrics will have their threads broken by the needle, creating permanent holes where loops simply drop out, while stretchy fabrics make it impossible to hold the necessary drum-like surface tension inside your hoop.
Cutting and Preparation
Monk’s cloth has a loose weave that frays rapidly along freshly cut edges if left unfinished.
| Fabric Piece | Dimensions | Edge Treatment | Quantity |
|---|---|---|---|
| Foundation Square | 13 x 13 in (33 x 33 cm) | Zigzag stitch around all 4 sides | 1 piece |
Cut your 1/4 yard (0.25 m) monk’s cloth into a 13 x 13 in (33 x 33 cm) square using sharp fabric scissors. This leaves an extra 1.5 in (3.8 cm) border on all sides beyond the 10 in (25 cm) embroidery hoop, providing ample fabric to grasp when stretching. Secure all four raw cut edges by sewing a wide zigzag stitch (or serging) along the perimeter to prevent the loose warp and weft threads from unravelling as you pull the fabric taut.
Step 1: Design Transfer and Hoop Setup
Once your fabric edges are secure, you can set up your working canvas so the foundation remains completely rigid while stitching.
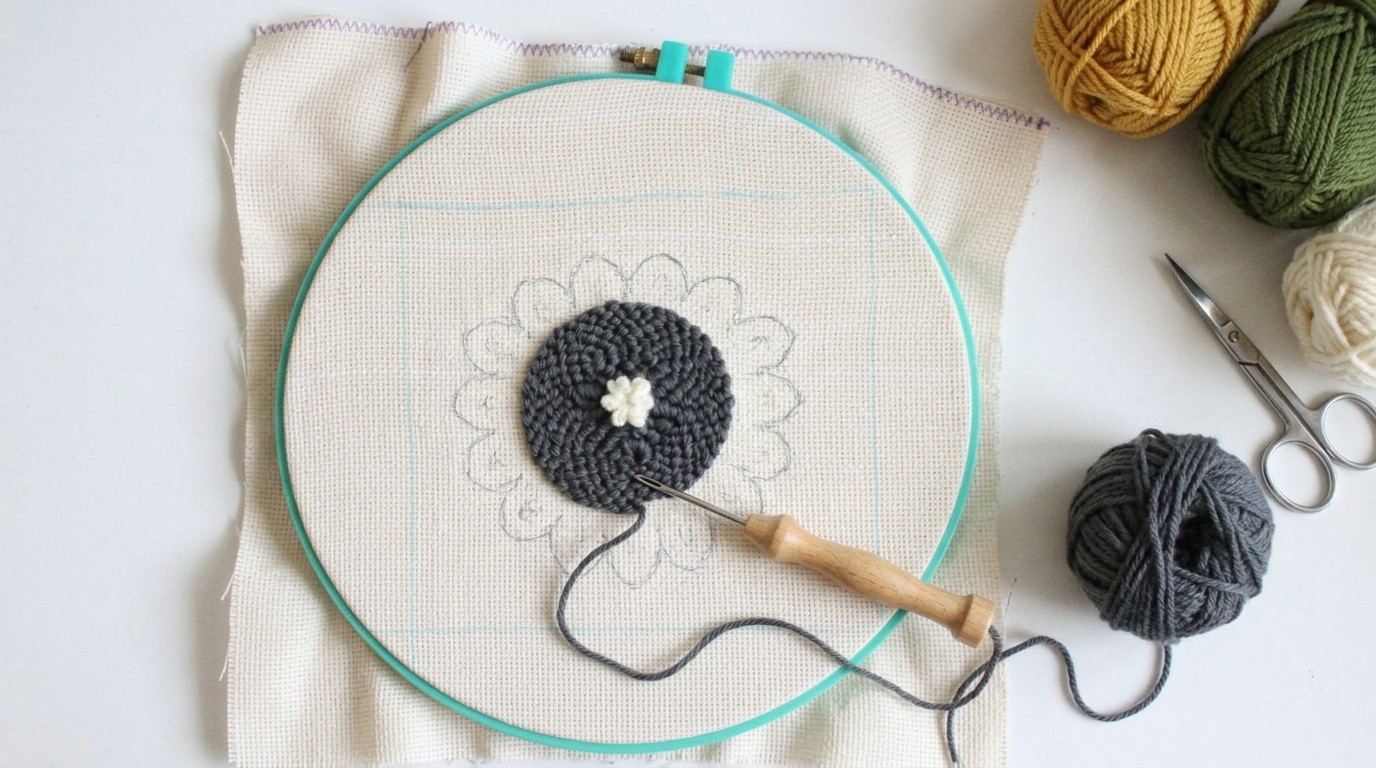
- Mark the floral outline: Lay your prepared 13 x 13 in (33 x 33 cm) monk’s cloth square flat on a table. Using a water-soluble fabric marker or soft graphite pencil, lightly draw your concentric floral motif in the center. Sketch an inner circle for the white center, surrounded by three successive rings: a narrow ring for dark grey, a wider ring for olive green, and an outer scalloped petal border for mustard yellow, keeping the entire motif within a 9 in (23 cm) diameter.
- Separate the hoop rings: Loosen the tightening screw on your 10 in (25 cm) embroidery hoop and separate the inner ring from the outer ring. Place the inner ring flat on your work surface.
- Position the monk’s cloth: Center your marked monk’s cloth square over the inner ring, ensuring the drawn floral pattern sits squarely in the middle.
- Clamp the outer ring: Press the outer hoop ring down over the fabric and inner ring. Tighten the top screw by hand until it begins to resist.
- Stretch to drum-tight tension: Gently pull the excess fabric edges outward, working around the perimeter in a circle. Tighten the screw further with a screwdriver or pliers, then pull the fabric edges again. Tap the center of the monk’s cloth; it should make a taut, drum-like sound with no wrinkles or sagging.
Pro tip: Re-check your hoop tension every 20-30 minutes of punching. Monk’s cloth naturally relaxes slightly under needle pressure, so give the edges an extra tug to maintain continuous, firm tension.
Step 2: Threading and Punching the Design
With your fabric prepared and stretched drum-tight, you are ready to thread your wooden punch needle and form your first textured loop stitches.
- Thread the punch needle: Insert the long wire yarn threader into the tip of the needle point, pushing it all the way through the metal barrel until it exits the top opening of the wooden handle. Feed your off-white yarn end through the wire loop, then pull the threader back out through the needle tip. Next, guide the threader through the small eye near the needle point, catch the yarn, and pull it through the eye so the yarn runs freely through the entire tool with a 1 in (2.5 cm) tail exposed.
- Punch the white floral core: Hold the wooden handle upright like a pencil, with the beveled opening of the needle pointing in the direction you plan to stitch. Push the needle straight down into the center of the drawn monk’s cloth until the wooden handle touches the fabric surface. Pull the 1 in (2.5 cm) starting yarn tail through to the loop side underneath.
- Form the inner loops: Slowly raise the needle back up just until the metal tip clears the fabric surface. Slide the tip forward along the fabric grain about 2 foundation threads (approximately 1/8 to 3/16 in / 3-5 mm) and press all the way down again. Continue punching in spiral rounds to fill the inner white circular core.
- Punch the dark grey ring: Snip the white yarn flush with the fabric surface on your working side. Thread your dark grey wool yarn and punch two to three concentric outline rows directly bordering the white center, following your marked guidelines.
- Fill the olive green band: Switch to your olive green yarn. Punch around the dark grey ring, working in concentric rounds until the green section is completely filled with dense, even loops on the reverse side.
- Complete the mustard yellow petals: Thread the mustard yellow yarn and punch the outermost scalloped petal shapes, following your marked outline first and then filling in the centers with uniform, parallel rows of punch stitches.
Step 3: Tension Check and Securing Ends
Completing the final petal stitches brings you to the inspection and finishing stage to ensure long-term durability.
- Inspect loop consistency: Turn your hoop over to examine the looped side. Check for any loose or overly long loops that stand out from the rest of the pile. Using the blunt tip of your yarn threader or a tapestry needle, gently nudge any uneven loops until the pile height is uniform across the entire 10 in (25 cm) diameter.
- Trim working yarn ends: Flip back to your flat stitching side. Trim all starting tails and color-change ends flush with the surface of the monk’s cloth using sharp fabric scissors. Because the cotton weave clamps around the yarn fibers, these ends do not require tying in knots.
- Apply optional backing adhesive: If your finished piece will be handled frequently or placed in a high-traffic area, paint a thin, even coat of flexible fabric glue or latex textile adhesive across the flat back side. Allow it to cure completely for 12 hours to permanently lock every stitch in place.
Troubleshooting Common Punch Needle Issues
If your stitches are not holding correctly as you work across the monk’s cloth, check this quick troubleshooting guide to correct the issue immediately:
| Problem | Probable Cause | Fix |
|---|---|---|
| Loops pulling out as needle rises | Needle is lifted too far above the cloth surface; yarn is snagged on the skein. | Keep the needle tip grazing the monk’s cloth as you advance; ensure the yarn feeds smoothly from the ball with zero resistance. |
| Foundation fabric sagging during work | Hoop screw is loose; fabric slipped under needle pressure. | Tug the monk’s cloth edges around the hoop perimeter until drum-tight and tighten the hoop screw securely with pliers. |
| Yarn splitting or bunching at the needle eye | Yarn is too thick for the needle gauge; needle eye is rough. | Switch to a medium worsted yarn weight or use a punch needle tool with a wider internal channel. |
| Irregular, patchy loop height | Needle is not being pressed all the way down to the handle. | Push the needle down fully on every single punch until the wooden handle makes contact with the monk’s cloth. |
Care and Display Tips
Your finished punch needle floral piece is naturally durable, but basic maintenance will keep the wool pile looking fresh and vibrant. Because this project is constructed directly inside a 10 in (25 cm) embroidery hoop, one way to display it is to leave it mounted in the hoop. Trim the excess monk’s cloth around the back, leaving a 1 in (2.5 cm) margin. Fold this border inward and secure it to the inside wooden or plastic ring using hot glue or a simple gathering stitch with strong thread.
To clean your finished piece, avoid machine washing or submerging it in water, as this can distort the tension of the monk’s cloth and felt the wool yarn. Instead, lightly dust the surface with a soft-bristled brush or use the upholstery attachment of your vacuum cleaner on low suction. If a spill occurs, spot clean gently by dabbing the affected loops with a damp cloth and mild wool-safe detergent, then lay the hoop flat to air dry away from direct heat and sunlight.
Frequently Asked Questions
What kind of yarn is best for punch needle embroidery?
Medium worsted-weight wool embroidery or tapestry yarn is suitable for standard wooden-handled punch needles. Wool offers natural bounce and grip, which helps loops lock securely into monk’s cloth without slipping. Avoid slippery, silky yarns or ultra-fine threads that slide out of the fabric weave.
Why are my loops falling out of the monk’s cloth?
Loops fall out when the yarn feed has tension or when the needle is lifted too high off the fabric between stitches. Ensure your yarn hangs completely loose from the skein with no pulling, and keep the needle tip touching the surface of the cloth as you glide to your next stitch.
Can I use regular embroidery floss for punch needle?
Standard six-strand embroidery floss is too fine for medium and chunky wooden punch needles and will simply slide out of monk’s cloth. If you want to use embroidery floss, you must use an ultra-fine punch needle tool specifically designed for floss and pair it with tightly woven cotton fabric like weaver’s cloth rather than monk’s cloth.
How do I transfer a design onto monk’s cloth?
Draw your design directly onto monk’s cloth using a water-soluble fabric marker or a soft graphite pencil. Because monk’s cloth has an open weave, you can also place the fabric directly over a printed paper template on a light box or against a sunny window, tracing the lines directly onto the fabric surface.
Enjoying Your Finished Punch Needle Home Decor
Completing your 10 in (25 cm) diameter floral hoop gives you a rich, tactile piece of textile art that adds warmth and handcrafted texture to any room. Punch needle floral embroidery for beginners provides an accessible entry point into modern fiber crafts, teaching you essential skills like fabric tensioning, controlled loop placement, and clean color blocking. Hang your finished hoop as a statement wall accent or place it on a bookshelf display. As you plan your next punch needle project, remember to keep your foundation fabric drum-tight to guarantee crisp, uniform loops every time.