In this post
- At a Glance
- Why Visible Mending Denim Repair Stitching Works
- Materials and Tools Needed
- Choosing the Right Fabric for Darning
- Preparation and Assessment
- Step-by-Step Darning Instructions
- Finishing and Pressing
- Variations and Customizing
- Troubleshooting Common Mending Issues
- Care and Washing Your Mended Denim
- Frequently Asked Questions
- Revitalize Your Trousers with Needle and Thread
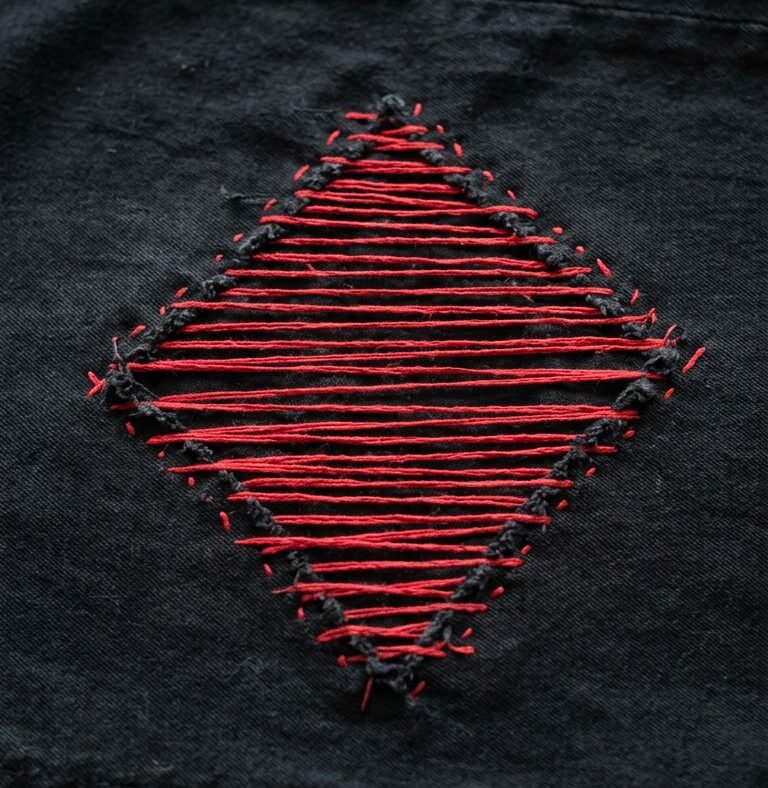
A torn pair of dark trousers does not belong in the trash when you can restore it with hand embroidery. Mastering Visible Mending Denim Repair Stitching allows you to reinforce worn patches and cover holes using contrasting red embroidery thread over black cotton fabric. This beginner-friendly project teaches you how to bridge damaged fibers, balance thread tension, and create a striking geometric darning pattern by hand. You will transform a weakened diamond-shaped tear into a durable, functional design feature in just 1 to 2 hours. By learning foundational needlework techniques like horizontal satin-style bridging and structural darning, you can extend the life of your everyday clothes without needing a sewing machine.
At a Glance
Understanding the basic parameters of this mending method helps you plan your work area and set aside sufficient time for careful hand stitching.
| Project Detail | Specification |
|---|---|
| Skill Level | Beginner |
| Time Required | 1-2 hours |
| Finished Size | Varies (matches the damaged area) |
| Main Fabric | Heavyweight cotton denim and cotton twill |
| Key Techniques | Visible mending, darning stitch, and patching |
Why Visible Mending Denim Repair Stitching Works
Traditional tailoring often focuses on invisible repairs, which can be frustrating to execute by hand and frequently tear open along the original weak points. Visible mending takes the opposite approach by celebrating the repair openly. Placing vibrant, contrasting red thread across deep black twill highlights the craftsmanship while building a dense network of new fibers directly over the tear.
This technique creates a flexible, woven bridge that distributes movement stress across a wider surface area of sound fabric. Instead of pulling frayed edges tightly together, which puckers heavy twill, darning fills the open space with layered stitches. Beginners learn how needle angle, grain alignment, and consistent thread tension prevent fabric distortion while restoring structural integrity to high-friction garments.
Materials and Tools Needed
Hand embroidery on heavy textiles requires tools that can pierce tightly woven twill without splitting your stitching thread.
- 1 pair of damaged denim pants: Black cotton denim or heavy twill with a worn area or open tear.
- Embroidery floss or darning thread: Stranded cotton embroidery floss or perle cotton in a contrasting bright red.
- Scrap fabric for backing patch (optional): Lightweight to medium-weight black cotton canvas or twill scrap, cut 1/2 inch (5.1 cm) larger than the hole on all sides.
- Embroidery needle or darning needle: Size 3 to 5 embroidery (crewel) needle or a sharp darning needle with an eye large enough for multiple strands of floss.
- Fabric scissors: Sharp shears for trimming frayed edges and cutting clean thread lengths.
- Embroidery hoop (optional): A 4-inch (10 cm) wooden or plastic hoop to maintain fabric tension across flat areas.
- Iron: Standard household iron and ironing board for flattening seams and setting the finished stitches.
Choosing the Right Fabric for Darning
Heavyweight cotton denim and cotton twill provide the stable, non-stretch foundation necessary for structural hand darning. These twill weaves feature dense warp and weft threads that securely anchor stitches without pulling out under physical strain. When working on 10 to 14 oz cotton denim, your needle can grip individual woven threads outside the damaged boundary, establishing a solid anchor zone.
Avoid applying this specific horizontal darning method to lightweight knits, jersey, or high-stretch denim blends containing more than 2% elastane. Stretchy, flexible fabrics easily warp and pucker under the tension of dense cotton embroidery floss, creating uneven ridges when worn. Sturdy non-stretch foundations preserve the flat geometry of your diamond repair and maintain consistent tension over repeated washings.
Preparation and Assessment
Proper preparation stabilizes the perimeter of the tear so the repair will not unravel beneath your stitches.
- Turn the black denim trousers right side out and spread the damaged zone flat over a firm surface. Examine the weave surrounding the opening to identify where the fabric is thin and where it remains strong and stable.
- Use fabric scissors to snip away loose, tangled horizontal threads inside the diamond-shaped damaged area. Leave short, clean frayed edges measuring about 1/16 inch (1.5 mm) to preserve as much original structure as possible without creating bulky knots.
- If the fabric around the tear is severely thinned, cut a small cotton backing patch that extends 1/2 inch (5.1 cm) past the damaged perimeter on all sides. Slide this scrap inside the trouser leg behind the hole, smoothing it completely flat against the wrong side of the denim.
- Secure the backing patch temporarily using basting stitches or safety pins placed well outside the stitching area. If using an embroidery hoop, center the hole within the rings, tightening the screw just enough to hold the fabric taut without stretching the denim out of its natural grain alignment.
Pro tip: Never pull the fabric drum-tight in an embroidery hoop if the garment contains slight mechanical stretch. Doing so will cause the finished stitching to pucker severely once you remove the hoop.
Step-by-Step Darning Instructions
Constructing the mend involves building parallel horizontal bridges and then anchoring them into the stable fabric surrounding the tear.
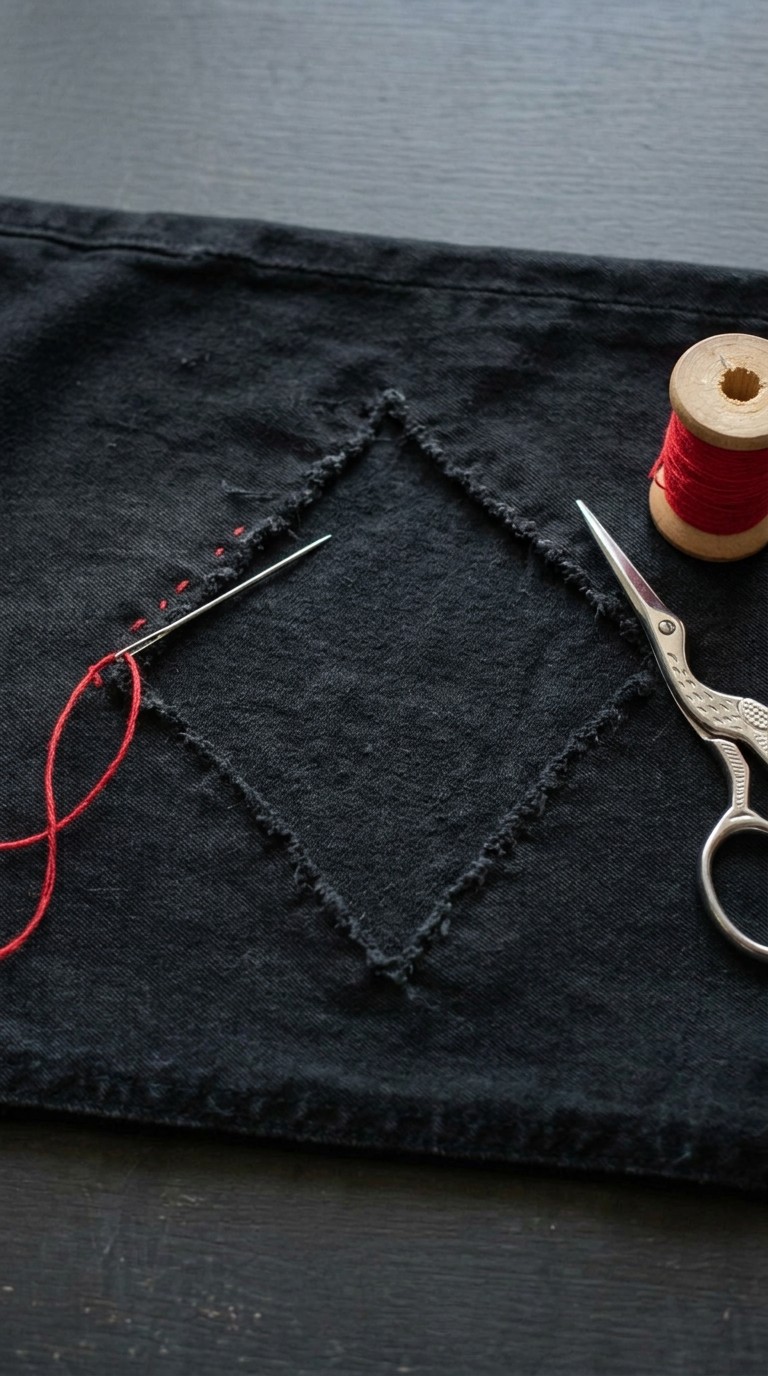
Anchoring and Parallel Stitches
- Cut an 18-inch (45 cm) length of red embroidery floss. If using 6-strand floss on heavy twill, separate it into 3 or 4 strands for balanced coverage, or use all 6 strands for a bold, thick texture. Thread your embroidery needle and tie a secure knot at the long end.
- Bring the needle up from the wrong side of the denim into the sound fabric, roughly 1/4 inch (6 mm) to the left of the widest point of the diamond-shaped tear. Pull through until the knot rests firmly against the inside of the garment or backing patch.
- Take a tiny running stitch into the sound fabric to firmly anchor the thread before spanning the gap.
- Carry the needle horizontally across the opening to the right side of the tear. Insert the needle into the healthy denim 1/4 inch (6 mm) past the right edge of the damage, pulling the thread flat across the opening.
- Bring the needle back up one yarn-width above or below your initial entry point on the right side. Carry the thread horizontally back across the opening to the left side, entering the stable fabric 1/4 inch (6 mm) past the tear edge.
- Continue working parallel horizontal straight stitches back and forth across the entire height of the diamond opening. Keep the stitches resting edge-to-edge without overlapping or leaving open gaps. Maintain a relaxed, even tension so the thread lays flat without cinching the denim edges together.
Pro tip: Stagger the entry and exit points of your parallel stitches into the sound denim. Creating an irregular, stepped edge prevents putting continuous stress along a single vertical grain line, which could cause the fabric to split later.
Weaving the Perpendicular Threads
- When you reach the top edge of the diamond with your horizontal threads, bring the needle down to the bottom corner of the mend on the sound fabric without cutting the floss.
- Bring the needle up through the denim 1/4 inch (6 mm) below the bottom edge of the horizontal stitch band.
- Slide the needle over and under the parallel red horizontal threads across the center of the patch, using the blunt back of the needle eye first to avoid piercing through the existing strands.
- Insert the needle into the stable denim 1/4 inch (6 mm) above the top edge of the mend, drawing the vertical thread snug against the horizontal field.
- Bring the needle back down, shifting one thread-width to the side, and weave back toward the bottom, reversing the under-over pattern from the previous pass.
- Repeat this perpendicular weaving across the central zone of the diamond opening until the horizontal bars form a dense, reinforced fabric mesh across the repair area.
Finishing and Pressing
Neat finishing locks the thread ends in place and blends the embroidery stitches into the heavy cotton twill.
- Push the needle through to the wrong side of the denim once the diamond area is completely filled and reinforced.
- Weave the needle through the backs of 4 or 5 structural stitches on the underside of the sound fabric. Form a small loop, pass the needle through the loop to create a flat knot, and cinch it down close to the fabric base.
- Trim the remaining thread tail with sharp fabric scissors, leaving a 1/8 inch (3 mm) end to prevent the knot from slipping untied during wear.
- Remove the embroidery hoop and any basting pins holding the inner patch. Trim any excess backing patch fabric on the inside of the pant leg down to 1/4 inch (6 mm) around the stitched zone.
- Set your iron to the cotton setting (medium-high heat) with light steam. Place a clean pressing cloth over the right side of the red stitching to protect the embroidery floss sheen, and press firmly for 8 to 10 seconds without sliding the iron across the raised texture.
Variations and Customizing
Once you are comfortable with basic horizontal darning, you can adjust your design elements to suit different garment styles and repair locations.
- Multi-Tonal Color Blocking: Alternate between crimson, burgundy, and coral strands across the horizontal rows to create a subtle gradient over dark denim.
- Geometric Shape Variations: Outline square, rectangular, or hexagonal borders using temporary chalk before you begin stitching to mend tears of different shapes.
- Sashiko-Style Reinforcement: Add short running stitches in a grid pattern around the perimeter of the darning zone to reinforce thinned areas before they turn into holes.
- Exposed Contrast Patching: Use a bright patterned or printed cotton backing patch beneath the tear, spacing your horizontal red darning stitches 1/8 inch (3 mm) apart to let the backing fabric peek through.
Troubleshooting Common Mending Issues
Small errors in tension or placement can impact both the look and structural durability of your hand embroidery repair.
| Problem | Likely Cause | Expert Fix |
|---|---|---|
| Puckering around the repair border | Horizontal threads pulled too tightly across the open gap. | Slide the eye of a needle beneath tight threads to gently lift and ease tension before anchoring the end, or unpick the last few passes and re-stitch with a relaxed hand. |
| Gaps showing through the mend | Horizontal bridge stitches spaced too far apart. | Work a second pass of parallel straight stitches in between the initial rows to fill empty channels completely. |
| Denim tearing at the anchor points | All stitches ending along the exact same vertical grain line. | Vary the length of your anchor stitches so they stop at different distances (1/8 inch to 3/8 inch / 3 mm to 10 mm) outside the hole perimeter. |
| Thread tangling or knotting during stitching | Working with thread lengths longer than 18 inches (46 cm). | Cut shorter working lengths and allow the needle to hang freely every few stitches to untwist the strands naturally. |
Care and Washing Your Mended Denim
Hand-embroidered repairs require sensible laundering habits to keep the thread tension smooth and the colors bright. Always turn your mended black denim pants inside out before washing to prevent the raised embroidery threads from catching on buttons, zippers, or the washing machine drum. Wash the garment in cold water on a gentle or delicate cycle using a mild liquid laundry detergent without optical brighteners or bleach.
Line dry the trousers flat or hang them by the cuffs away from direct sunlight to preserve the deep black dye and vibrant red stitching. Avoid high-heat tumble dryers, as intense tumbling and heat can shrink the denim fibers at a different rate than the cotton embroidery floss, causing unwanted puckering across your flat woven mend. If the darning area feels stiff after air drying, press it briefly with a warm steam iron over a pressing cloth to restore its shape.
Frequently Asked Questions
What kind of thread should I use for visible mending on denim?
Standard 100% cotton embroidery floss (using 3 to 6 strands) or size 8 perle cotton works well on heavy denim and twill. These threads match the fiber content and weight of cotton trousers, allowing the repair to wear, wash, and age naturally alongside the base fabric.
Do I need an embroidery hoop to repair denim jeans?
An embroidery hoop is optional and is best used on flat, spacious areas like the thigh or back pocket. In tight areas like narrow pant legs or crotch seams, working freehand while supporting the fabric over your fingers gives you better control without overstretching the twill.
Is visible mending strong enough for high-stress areas like knees?
Yes, visible mending provides functional strength on high-friction areas when paired with an internal cotton backing patch. The woven darning stitches create a multi-layered structure that redistributes movement stress across the surrounding healthy denim rather than concentrating it at the tear.
Can I use this darning technique without a backing patch?
You can execute this technique without a backing patch if the edges of the hole consist of strong, intact denim fibers. However, if the fabric surrounding the diamond opening is worn thin or frayed, a small cotton backing patch provides the foundation required to hold your stitches long term.
Revitalize Your Trousers with Needle and Thread
Mending your own garments is an effective way to keep sturdy, comfortable clothing in active rotation while practicing foundational needlework. By applying Visible Mending Denim Repair Stitching to damaged black twill, you turn everyday wear and tear into an eye-catching decorative feature. Remember to keep your thread tension relaxed as you bridge open gaps so your finished darning panel lays flat against the fabric. Pick up your needle, secure your anchor stitches, and bring new life to your favorite denim today.