In this post
- At a Glance
- Why This Yarn Tassel Project Works So Well
- Materials and Tools Needed
- Choosing the Right Yarn for Your Tassels
- Cutting Chart and Preparation
- Step-by-Step Instructions: How To Make A Tassel Easy Diy Tutorial
- Finishing and Pressing Your Tassels
- Variations and Customizing
- Troubleshooting Common Tassel Issues
- Care and Washing Instructions
- Frequently Asked Questions
- Mastering Your Finished Home Decor Tassels
Learning how to make a tassel easy diy tutorial projects require is one of the most practical fiber skills you can master for home decor. Whether you want to embellish the corners of a throw pillow, trim a handmade blanket, or create a hanging wall accent, making your own yarn accents gives you total control over color, fullness, and length. This beginner-friendly project takes only 15-20 minutes from start to finish, requiring no complex tools or previous fiber arts experience. Using basic household materials and medium-weight yarn, you can produce full, balanced accents that hold their shape. In this tutorial, you will discover how to create a classic 5-6 in (13-15 cm) long yarn tassel featuring a secure hanging loop, a smooth rounded head, a tight neck binding, and a crisp, even fringe skirt.
At a Glance
Before gathering your supplies, review the fundamental specifications for this project to ensure your finished pieces match your desired home decor application.
| Skill Level | Time to Complete | Finished Size | Main Material | Key Technique |
|---|---|---|---|---|
| Beginner | 15-20 minutes | approx 5-6 in (13-15 cm) long | Worsted weight (4) cotton or acrylic yarn | Cardboard wrapping and neck binding |
Why This Yarn Tassel Project Works So Well
A well-constructed tassel relies on balance and tension rather than complicated knots. When you understand the anatomy of a tassel, creating consistent, professional accents becomes straightforward. The core structure consists of four parts: the top hanging loop, the rounded head, the wrapped neck binding, and the straight fringe skirt hanging downward. Each component supports the next, ensuring the strands remain aligned without shedding.
The method outlined here prevents the most common beginner mistakes, such as loose neck wraps that slide down over time or uneven bottom edges that look ragged. By using a firm cardboard template, you maintain identical strand lengths across every single revolution. The wrapped neck binding locks the core fibers into place, shaping a bulbous top head that stays plump and symmetrical even when handled frequently in home environments.
Materials and Tools Needed
Simple tools produce clean results when selected with intention. You will need the following exact supplies to create one finished accent:
- 1 skein of yarn: Worsted weight (4) cotton or acrylic yarn in your chosen color.
- Cardboard template: One rigid piece measuring 4-6 in (10-15 cm) wide, cut from clean shipping boxes or heavy chipboard.
- Tying cord: Matching sewing thread or extra strands of your main yarn for the top loop and neck wraps.
- Sharp scissors: Fabric or embroidery shears that cut cleanly through multiple strands at once.
- Yarn needle: A blunt-tipped tapestry needle (size 13 or 14) with a large eye to bury yarn ends inside the core.
Choosing the Right Yarn for Your Tassels
The fiber you choose directly dictates the weight, drape, and visual texture of your finished piece. Medium worsted weight (4) yarn works well for home decor accents because it provides clear definition and clean individual plies. Cotton yarn produces a dense, structured tassel with a matte finish and defined fringe strands that hang straight down without static cling. Acrylic yarn offers a lighter, loftier feel with a subtle sheen, making it easy to create a plump, rounded head without adding excessive weight.
Avoid single-ply roving yarns, ultra-fuzzy mohair blends, or highly textured novelty yarns for this project. Loosely spun roving lacks the structural integrity needed to withstand tight neck binding, causing the fibers to pull apart under tension. Textured yarns obscure the neat horizontal lines of the wrapped neck and produce a messy, uneven fringe skirt that is difficult to trim cleanly.
Pro tip: If you plan to attach your tassels to items that need frequent laundering, such as cotton throw blankets, select 100% mercerized cotton yarn to prevent the fringe from pilling or fuzzing over time.
Cutting Chart and Preparation
Careful preparation of your template and yarn ties guarantees consistent sizing across multiple pieces. Cut your ties before you begin wrapping the body so they are ready the moment you finish winding.
| Piece Name | Quantity | Cut Dimensions / Count | Purpose |
|---|---|---|---|
| Cardboard Template | 1 | 4-6 in (10-15 cm) wide x 4 in (10 cm) tall | Rigid winding guide for uniform strand length |
| Top Hanging Loop | 1 | 12 in (30 cm) long | Suspends the tassel and secures the top bundle |
| Neck Binding Strand | 1 | 18-24 in (45-60 cm) long | Forms the cinched neck and rounded bulbous head |
| Main Body Wrap | 1 continuous strand | 50-70 full revolutions around board | Forms the dense, straight fringe skirt |
To prepare your cardboard template, cut a clean rectangle from heavy, non-bending corrugated cardboard or mounting board. Ensure the top and bottom edges are cut completely straight with no ragged ridges or dents that could catch the yarn plies during winding.
Step-by-Step Instructions: How To Make A Tassel Easy Diy Tutorial
Follow these progressive stages to assemble, bind, and finish your home decor accent.
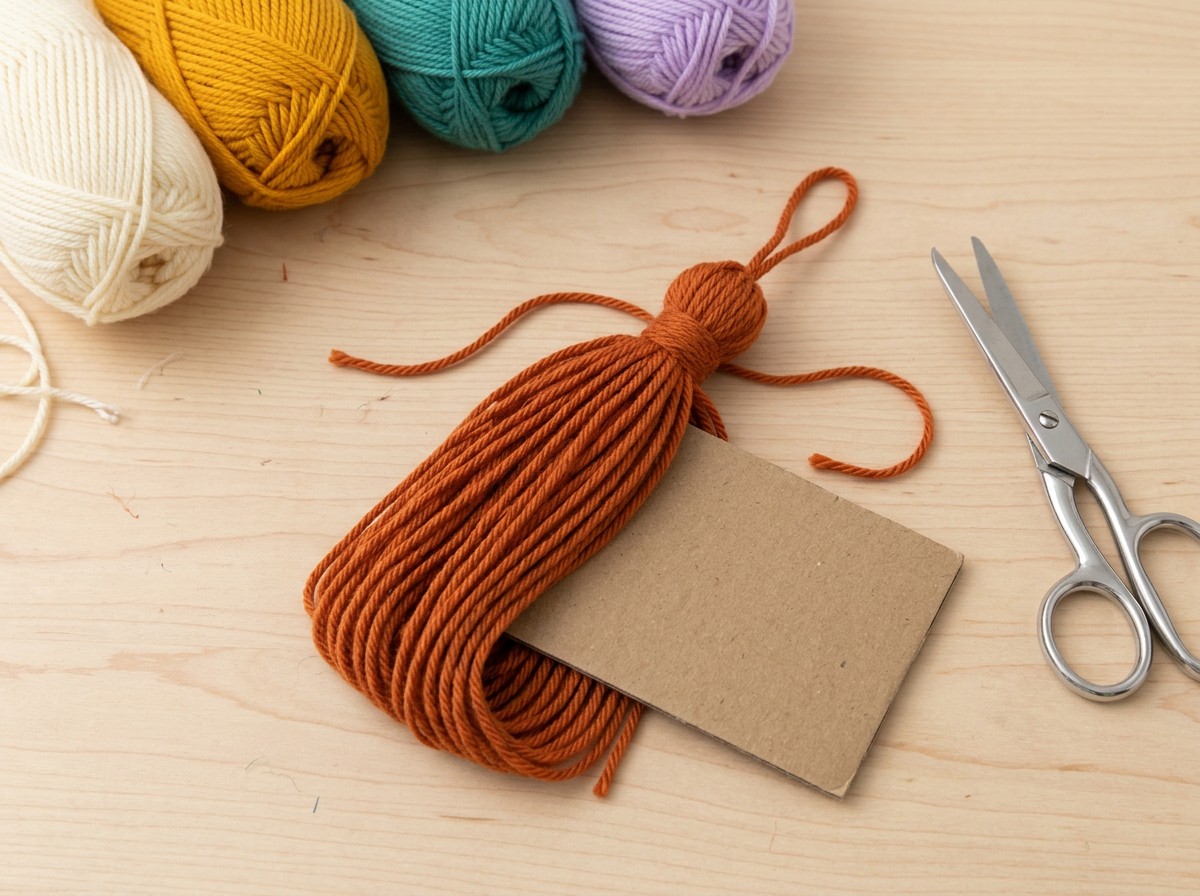
Wrapping the Yarn
- Anchor the yarn end: Hold the free end of your worsted weight yarn against the bottom edge of the 4-6 in (10-15 cm) cardboard template with your non-dominant thumb.
- Wind around the template: Wrap the yarn continuously around the cardboard from bottom to top and back down, maintaining smooth, even tension. Do not pull so tightly that the cardboard bows inward, as this creates uneven strand lengths.
- Complete 50 to 70 wraps: Continue winding until you reach 50 full wraps for a lightweight drape or 70 wraps for a dense, plump body. Cut the working yarn flush with the bottom edge of the cardboard.
Forming the Top Loop
- Thread the hanging tie: Cut a 12 in (30 cm) piece of yarn and thread it onto your yarn needle. Slide the needle under all wrapped strands along the top edge of the cardboard template.
- Tie the primary anchor knot: Pull the two ends of the 12 in (30 cm) strand upward so they are equal in length. Tie a firm double knot securely against the center top of the wrapped yarn bundle.
- Slide off the cardboard: Carefully slide the entire bundle off the template, keeping the strands parallel and preventing the top knot from shifting off-center.
Pro tip: Leave the tails of the top hanging loop long until you are ready to install the piece onto your decor item; this allows you to tie or sew it directly through cushion seams or blanket corners.
Binding the Neck and Head
- Define the head area: Smooth the yarn bundle downward with your fingers so all strands hang straight. Measure approximately 1 in (2.5 cm) down from the top anchor knot to designate the rounded bulbous head.
- Wrap the neck binding: Take your 18-24 in (45-60 cm) binding strand. Position one short end pointing downward along the body, form a small upward “U” bight against the yarn, and wrap the long tail tightly around the bundle 5 to 7 times over the bight, working downward.
- Secure and conceal the knot: Pass the working end through the lower loop of the bight. Pull the upper tail firmly to draw the loop and knot beneath the wrapped neck bands. Trim excess thread tails flush, or thread them onto your yarn needle and pull them downward into the center core of the fringe.
Trimming the Fringe
- Cut the bottom loops: Insert the blade of your sharp scissors through the closed bottom loops of the yarn bundle. Cut straight across to release all loops into individual fringe strands.
- Smooth and align the skirt: Hold the top hanging loop and shake the tassel gently. Run your fingers downward through the fringe to align all plies parallel to one another.
- Trim to final length: Place the tassel flat on a cutting mat or firm surface. Using sharp scissors, trim the bottom ends in a single horizontal line, removing roughly 1/4 in (6 mm) to achieve a finished length of approx 5-6 in (13-15 cm) long.
Finishing and Pressing Your Tassels
Directly after cutting, yarn strands often retain slight kinks and waves from being wound around the skein and template. Straightening these fibers creates a polished home decor accessory that looks tailored rather than craft-room assembled.
Hold the finished piece by its top loop and hold a garment steamer or steam iron 2-3 in (5-8 cm) away from the fringe skirt. Allow the steam to penetrate the fibers for 3-5 seconds without touching the hot metal surface directly to acrylic yarn, which melts under direct heat. While the fibers are warm and relaxed, stroke the fringe downward with your fingers or a wide-tooth comb. Once cooled completely, give the bottom edge one final micro-trim with sharp shears to catch any stray fibers that dropped during steaming.
Variations and Customizing
Handmade accents can be customized to match any interior color scheme by alternating palette choices and grouping styles:
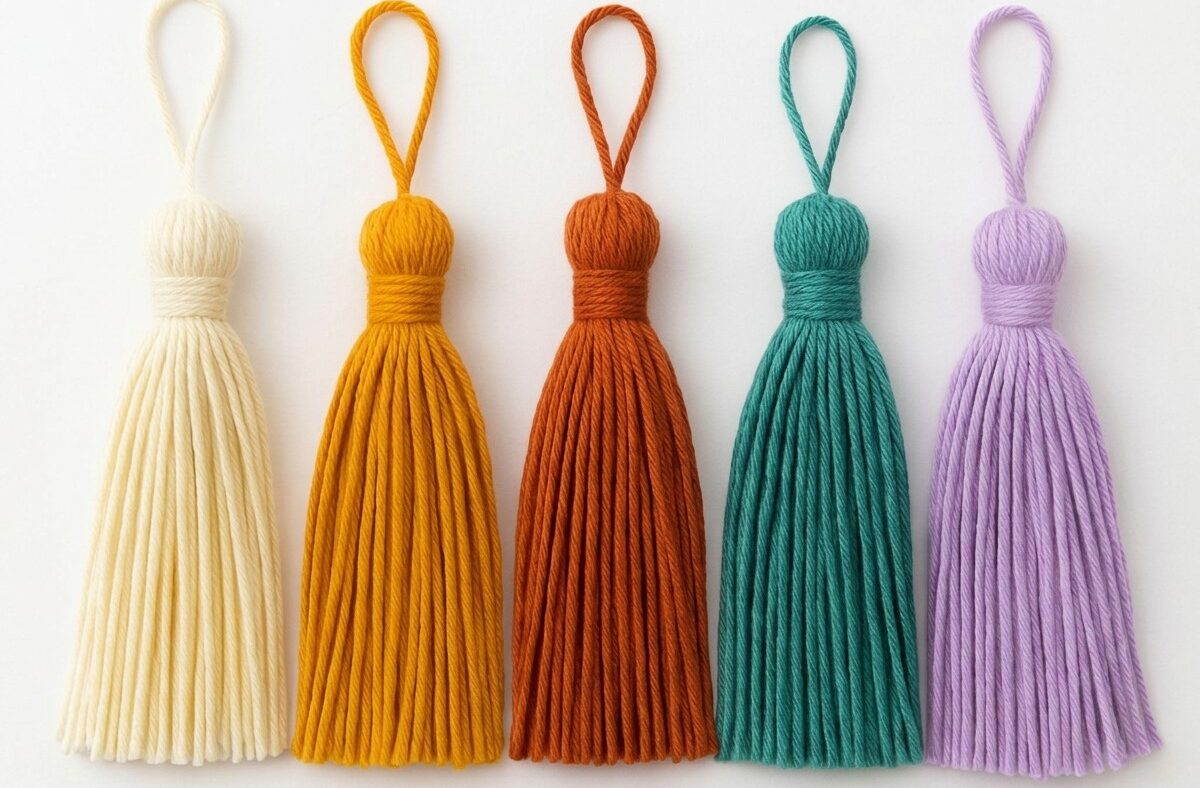
- Earthy Autumn Palette: Combine mustard yellow and rust orange tassels along the edge of a woven linen table runner for seasonal warmth.
- Coastal Living Trio: Group cream, teal, and soft lavender accents together on curtain tiebacks or basket handles to introduce soothing color blocks.
- Color-Blocked Neck Wraps: Use a high-contrast yarn color for the 18-24 in (45-60 cm) neck binding strand against a solid cream body for a clean graphic accent.
- Multi-Toned Skirts: Hold two different colored strands (such as teal and cream) together while wrapping the cardboard template to produce a mixed-tweed texture.
Troubleshooting Common Tassel Issues
If your finished piece does not hang straight or feels unstable, consult this guide to identify and correct the issue.
| Problem | Likely Cause | Correction |
|---|---|---|
| Ragged, crooked fringe skirt | Dull scissors or cutting loops while suspended | Lay tassel flat against a hard edge, comb flat, and cut across using ultra-sharp fabric shears in one continuous motion. |
| Loose neck binding that shifts | Insufficient wrapping tension or unsecured knot | Rewrap with an 18-24 in (45-60 cm) tie, pulling each turn firmly; pull the locking knot entirely beneath the wrapped band. |
| Head looks flat or asymmetrical | Top loop knot shifted off-center during removal | Center the top anchor knot exactly over the midpoint of the bundle before cinching the neck binding 1 in (2.5 cm) below. |
| Fringe strands bunch or splay outward | Residual yarn crimp from skein storage | Apply light steam from 2-3 in (5-8 cm) away and gently comb downward; allow to cool flat before hanging. |
Care and Washing Instructions
Home decor accents require gentle handling to preserve the structural neck wrapping and keep the individual plies looking crisp over time. Spot cleaning with a damp cloth and mild liquid detergent is the safest method for routine maintenance on both cotton and acrylic pieces.
If full washing is required—such as when attached to a machine-washable throw pillow cover—hand wash the item in cool water without wringing. Gently press the excess water out between two clean towels. Comb the fringe straight while damp, reshape the rounded head with your fingertips, and lay the item flat to air dry completely away from direct heat.
Safety note: Small decorative items with loose fringe cords are not suitable for children under 3 years of age due to potential entanglement hazards.
Frequently Asked Questions
What weight of yarn is best for making a DIY tassel?
Worsted weight (4) cotton or acrylic yarn is recommended because it balances strand definition and body fullness. Lighter yarns require hundreds of wraps to look dense, while bulky yarns create an oversized, clumsy neck binding.
How do I keep the wrapped neck from unraveling?
Use a hidden bight wrap (gathering knot) where the final knot is drawn completely underneath the horizontal coils of the neck. Alternatively, thread the tie ends onto a yarn needle and draw them straight down through the center core of the tassel before trimming.
Can I use cardboard from home for the tassel template?
Yes, any rigid corrugated shipping box or heavy chipboard works perfectly as long as it does not bend under winding tension. Cut the cardboard to 4-6 in (10-15 cm) wide with completely straight, smooth edges so the yarn slides off easily.
How do I trim the tassel fringe evenly?
Wrap a piece of painter’s tape or a strip of paper tightly around the lower body of the tassel to act as a straight cutting guide. Lay the tassel flat on a table and cut across the bottom directly along the edge of the guide with sharp fabric shears.
Mastering Your Finished Home Decor Tassels
You have now completed the steps in this how to make a tassel easy diy tutorial, producing a clean, structured accent ready for your living space. By focusing on consistent wrapping tension around your cardboard template and securing the neck firmly, you achieve a balanced 5-6 in (13-15 cm) long accessory every time. As a final practical tip, always keep a dedicated cardboard template labeled with your wrap count in your craft kit so your future decor projects maintain identical proportions.